Combining Shinkai tools : from PowerPoint to audio
Introduction
In this tutorial, you will learn to combine Shinkai tools to create an AI tool that extracts the text content of a .pptx presentation, generates a text for a lesson about the presentation, and generates an audio file of this lesson. This tool is available in the Shinkai AI Store.
You will learn how to :
- build a tool and add features step by step using the Shinkai AI-assisted tool builder.
- combine Shinkai tools efficiently (optional features, customizability, config validation, error handling)
- implement Optical Character Recognition
- implement text to speech
- use the created tool
This tutorial is a step-by-step guide on how to implement the full tool.
You can find the complete code below for reference, but we will see how to use the AI-assisted tool builder and how to prompt the AI to recreate its elements one by one. Additionally, you can see some usage examples in the last section of this tutorial (Part 7 : Using the tool).
# /// script
# dependencies = [
#   "requests",
#   "python-pptx",
#   "pytesseract",
#   "pillow",
# ]
# ///

from typing import Optional, List
import os
import requests
import re
import shutil
from pptx import Presentation
from pptx.enum.shapes import MSO_SHAPE_TYPE
import pytesseract
from PIL import Image
import io
from shinkai_local_support import get_home_path
from shinkai_local_tools import shinkai_llm_prompt_processor, eleven_labs_text_to_speech

class CONFIG:
    tesseract_path: str
    generate_audio: str  # "yes" or "no"

class INPUTS:
    file_path: str
    additional_lesson_generation_instructions: Optional[str] = "none"

class OUTPUT:
    content_of_the_presentation: Optional[List[str]]
    status: str
    message: Optional[str]
    lesson_about_the_presentation: Optional[str]
    audio_file: Optional[str]

def extract_text_from_text_frame(text_frame) -> str:
    return ' '.join([run.text for paragraph in text_frame.paragraphs for run in paragraph.runs if run.text])

def extract_text_from_table(table) -> str:
    cell_texts = []
    for row in table.rows:
        for cell in row.cells:
            cell_texts.append(extract_text_from_text_frame(cell.text_frame))
    return ' | '.join(cell_texts)

def extract_text_from_chart(chart) -> str:
    title = extract_text_from_text_frame(chart.chart_title.text_frame) if chart.has_title else ""
    x_axis = extract_text_from_text_frame(chart.category_axis.title.text_frame) if chart.category_axis.has_title else ""
    y_axis = extract_text_from_text_frame(chart.value_axis.title.text_frame) if chart.value_axis.has_title else ""
    return f"Title: {title}, X-Axis: {x_axis}, Y-Axis: {y_axis}"

def extract_text_from_shape(shape) -> List[str]:
    results = []

    if shape.has_text_frame:
        text = extract_text_from_text_frame(shape.text_frame)
        if text.strip():
            results.append(f"Text Shape: {text}")
    elif shape.has_table:
        table_text = extract_text_from_table(shape.table)
        if table_text.strip():
            results.append(f"Table: {table_text}")
    elif shape.has_chart:
        chart_text = extract_text_from_chart(shape.chart)
        if chart_text.replace("Title: , X-Axis: , Y-Axis: ", "").strip():
            results.append(f"Chart: {chart_text}")
    elif shape.shape_type == MSO_SHAPE_TYPE.PICTURE:
        try:
            image_data = shape.image.blob
            image = Image.open(io.BytesIO(image_data))
            text = pytesseract.image_to_string(image)
            if text.strip():
                results.append(f"Image Text: {text.strip()}")
        except Exception as e:
            pass
    elif shape.shape_type == MSO_SHAPE_TYPE.GROUP:
        for sub_shape in shape.shapes:
            sub_texts = extract_text_from_shape(sub_shape)
            if sub_texts:
                results.extend(sub_texts)

    return results

def clean_special_characters(text: str) -> str:
    text = re.sub(r'\n+', ' ', text)
    text = re.sub(r'#+\s*', ' ', text)
    text = re.sub(r'\*+', ' ', text)
    text = re.sub(r'\s+', ' ', text)
    return text.strip()

def get_base_filename(file_path: str) -> str:
    """Extract the base filename without extension from a path"""
    base_name = os.path.basename(file_path)
    if '?' in base_name:
        base_name = base_name.split('?')[0]
    return os.path.splitext(base_name)[0]

async def _read_presentation(file_path: str, working_file_path: str) -> OUTPUT:
    try:
        if file_path.startswith('http://') or file_path.startswith('https://'):
            response = requests.get(file_path)
            with open(working_file_path, 'wb') as f:
                f.write(response.content)
        else:
            with open(file_path, 'rb') as f:
                with open(working_file_path, 'wb') as w:
                    w.write(f.read())
        o = OUTPUT()
        o.status = "success"
        return o
    except Exception as e:
        o = OUTPUT()
        o.status = "error"
        o.message = f"Failed to read presentation: {str(e)}"
        return o

async def _retrieve_presentation(working_file_path: str) -> OUTPUT:
    if not os.path.exists(working_file_path):
        o = OUTPUT()
        o.status = "error"
        o.message = "No presentation file loaded."
        return o
    try:
        prs = Presentation(working_file_path)
        text_content = []
        for i, slide in enumerate(prs.slides, start=1):
            slide_content = []
            for shape in slide.shapes:
                shape_texts = extract_text_from_shape(shape)
                if shape_texts:
                    slide_content.extend(shape_texts)

            if slide_content:
                text_content.append(f"Slide {i}")
                text_content.extend(slide_content)

        o = OUTPUT()
        o.content_of_the_presentation = text_content
        o.status = "success"
        return o
    except Exception as e:
        o = OUTPUT()
        o.status = "error"
        o.message = f"Failed to process presentation: {str(e)}"
        return o

def validate_config(config: CONFIG) -> List[str]:
    """
    Validate configuration flags and dependencies.
    Returns a list of error messages if any issues are found.
    """
    errors = []
    # Validate tesseract_path
    if not config.tesseract_path:
        errors.append("Tesseract path is not provided.")
    elif not os.path.isfile(config.tesseract_path):
        errors.append(f"Tesseract path does not point to a file: {config.tesseract_path}")
    elif not os.access(config.tesseract_path, os.X_OK):
        errors.append(f"Tesseract executable is not executable: {config.tesseract_path}")

    # Validate generate_audio
    if config.generate_audio.lower() not in ["yes", "no"]:
        errors.append(f"Invalid config value for generate_audio: {config.generate_audio}. Must be 'yes' or 'no'.")

    return errors

async def run(config: CONFIG, inputs: INPUTS) -> OUTPUT:
    # Perform configuration validation
    errors = validate_config(config)
    if errors:
        o = OUTPUT()
        o.status = "error"
        o.message = "Configuration errors: " + "; ".join(errors)
        return o

    # Set Tesseract path after validation
    pytesseract.pytesseract.tesseract_cmd = config.tesseract_path

    home_path = await get_home_path()
    working_file_path = os.path.join(home_path, 'working.pptx')

    if not inputs.file_path:
        o = OUTPUT()
        o.status = "error"
        o.message = "No file path provided"
        return o

    read_result = await _read_presentation(inputs.file_path, working_file_path)
    if read_result.status == "error":
        return read_result

    process_result = await _retrieve_presentation(working_file_path)
    if process_result.status == "error":
        return process_result

    slides_content = process_result.content_of_the_presentation or []
    if not slides_content:
        o = OUTPUT()
        o.status = "warning"
        o.message = "No text content found in the presentation"
        o.content_of_the_presentation = []
        return o

    # Step 2: Formulate the prompt for the LLM
    prompt = (
        "<personality>"
        "You are a domain expert teacher extremely good at creating university level educational material."
        "</personality>"
        "<task>"
        "Create the text for an audio lesson of the following content extracted from a PowerPoint."
        "</task>"
        "<context>"
        "The content comes from text extraction and OCR from a PowerPoint, and is provided shape by shape and slide by slide."
        "Because of this the content form each slide might be a bit disorganised or sparse. You need to take your time step-by-step to reconnect the different pieces of content and understand how they fit together."
        "This content might also contain special characters coming from the text extraction formatting. Make sure to handle these special characters gracefully, they shouldn't appear in the text for an audio lesson."
        "</context>"
        "<lesson instructions>"
        "Do your best to understand in detailed the content of each slide, taking into consideration that it might be a bit disorganised due to the text extraction process."
        "The lesson should be very detailed and precise, and go over absolutely all the content in an organised manner. Be sure to use the entirety of the content for the lesson."
        "The lesson should be clear and engaging."
        "Make sure to introduce it when you move on to a new (sub)topic, so that the listener easily follow along."
        "</lesson instructions>"
        "<additional_instructions>"
        f"{inputs.additional_lesson_generation_instructions}"
        "</additional_instructions>"
        "<format instructions>"
        "Ensure the output is in one continuous paragraph without any special formatting or extra characters. Do not use and \ n formatting, just make it one long endless paragraph. It should be flowing text. You can still include sections in it but present them orally, not with special formatting."
        "The text must flow. Do not use any formatting, but just plain text."
        "</format instructions>"
        "<content>"
        "Here is the content to use for the lesson: "
        f"{' '.join(slides_content)}"
        "</content>"
    )

    # Step 3: Use the LLM to generate the audio lesson text
    llm_response = await shinkai_llm_prompt_processor({"prompt": prompt, "format": "text"})
    generated_text = llm_response['message']

    # Step 4: Clean any special characters from the generated text
    cleaned_text = clean_special_characters(generated_text)

    # Step 5: Convert the lesson text to audio if configured to do so
    audio_file_path = None
    if config.generate_audio.lower() == "yes":
        try:
            # Generate the audio with the TTS function
            tts_response = await eleven_labs_text_to_speech({"text": cleaned_text})
            generated_audio_path = tts_response['audio_file']

            # Get the base filename from the input file path and create the desired output path
            base_filename = get_base_filename(inputs.file_path)
            desired_audio_path = os.path.join(home_path, f"{base_filename}.mp3")

            # Rename the generated audio file to match the presentation name
            if os.path.exists(generated_audio_path):
                # Check if the destination file exists and remove it if it does
                if os.path.exists(desired_audio_path):
                    os.remove(desired_audio_path)
                # Copy the generated file to the desired location with the new name
                shutil.copy2(generated_audio_path, desired_audio_path)
                # Remove the original generated file
                os.remove(generated_audio_path)
                audio_file_path = desired_audio_path
            else:
                audio_file_path = generated_audio_path  # Fallback to the original path if something went wrong
        except Exception as e:
            o = OUTPUT()
            o.status = "error"
            o.message = f"Failed to generate or rename audio: {str(e)}"
            return o

    output = OUTPUT()
    output.content_of_the_presentation = slides_content
    output.lesson_about_the_presentation = cleaned_text
    output.audio_file = audio_file_path
    output.status = "success"
    return output
While trying to build such a complex tool in one go with the AI assistance might sound faster, building it step-by-step can be quicker, deliver a better tool, and be cheaper, because :
- the LLM works on smaller instructions and is less likely to get confused, leading to a better implementation of your instructions
- if needed, prompting the LLM to edit, fix, improve the code generated so far is faster and cheaper because there is less code to interpret and regenerate each time (compared to editing a full code for the entire tool)
We will see how to recreate this tool both ways : in one go and step-by-step.
Prerequisites
To follow this tutorial, you will need :
- the latest version of Shinkai Desktop installed
- to install Tesseract for OCR
- to install the ElevenLabs text-to-speech tool from the Shinkai AI Store and configure it
- an ElevenLabs API key with sufficient credits
Part 0 : Trying to build the full tool in one go with Shinkai AI-assisted tool builder
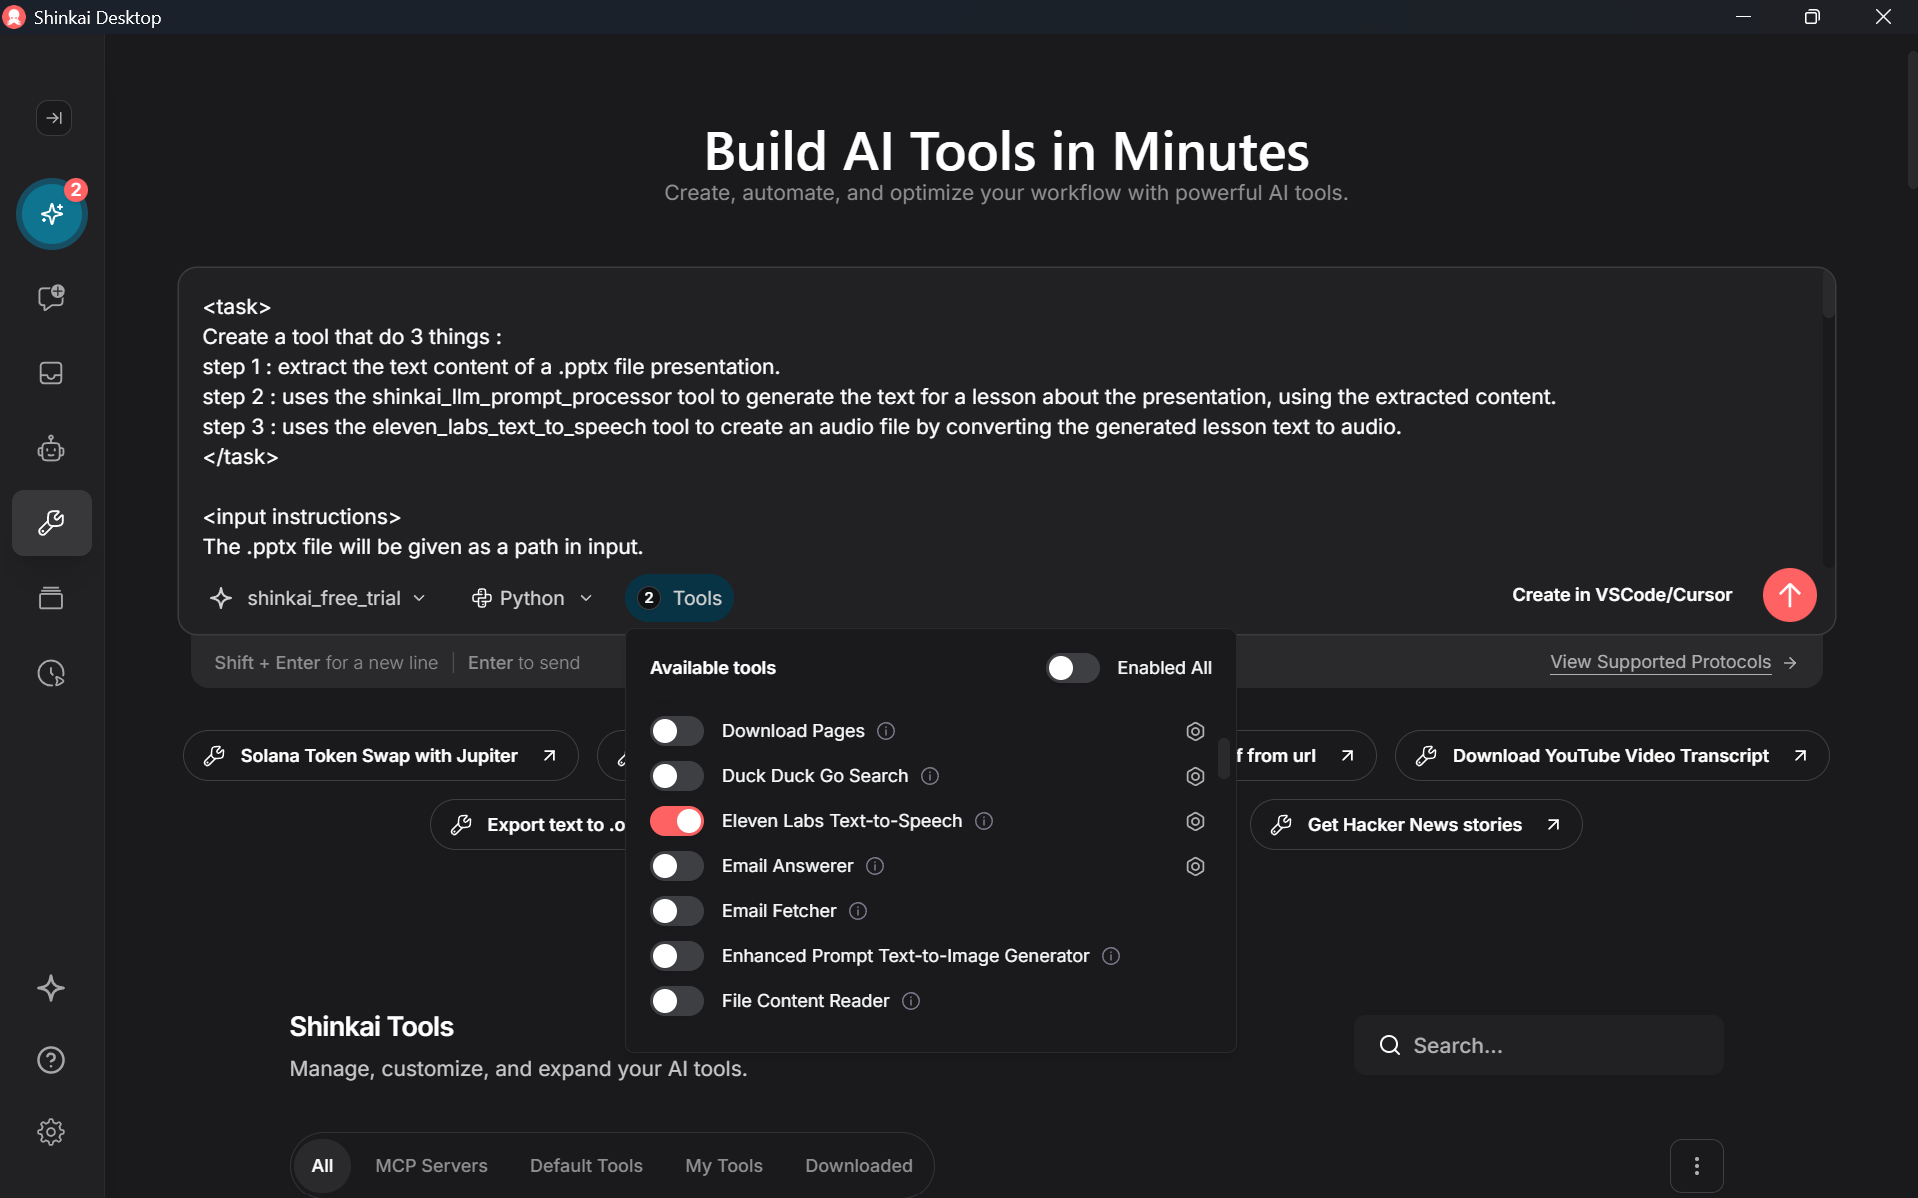
You can try to build a working prototype of the full tool using 1 detailed prompt and a performant LLM.
In the tool creation UI, select a performant LLM (e.g. gpt_4_1, shinkai_free_trial), select Python, activate the 2 tools 'shinkai_llm_prompt_processor' and 'eleven_labs_text_to_speech', write a prompt describing the tool well, and execute it.
For a good result, your prompt should be detailed and clearly describe :
- the goal of the tool to create and its steps
- how each of the selected tools should be used
- what you would want in configuration versus inputs
- which feature should be optional
- how to handle errors
Below is an example of a prompt to generate a full prototype of our PowerPoint to audio lesson tool. It uses tags to make things clear for the LLM. At the very least, such prompt will create a good code flow for the intended tool, from which you can debug, edit, improve.
<task>
Create a tool that do 3 things :
step 1 : extract the text content of a .pptx file presentation.
step 2 : uses the shinkai_llm_prompt_processor tool to generate the text for a lesson about the presentation, using the extracted content.
step 3 : uses the eleven_labs_text_to_speech tool to create an audio file by converting the generated lesson text to audio.
</task>

<input instructions>
The .pptx file will be given as a path in input.
An other input will be optional lesson instructions, and default to 'none'.
Use strings for both.
</input instructions>

<configuration instructions>
2 configurations.
The path to the Tesseract executable.
A 'yes' or 'no' option for audio generation.
Use strings for both.
</configuration instructions>

<instructions for step 1>
Extract the text content of the .pptx file slide by slide and shape by shape.
Use Tesseract OCR to extract text from picture shapes.
The executable path of Tesseract will be set in configuration.
</instructions for step 1>

<instructions for step 2>
First, add a check to see if the content extracted is empty or not. If it's empty say so in an error message. If there is content proceed with the lesson text generation.
Then create a strong prompt to generate the best lesson text from the extracted and format it well.
The prompt must explain that the content is coming from text extraction from a .pptx file, slide by slide and shape by shape, and so that a thorough effort should be made to best understand and put together the content of each slide.
The prompt must include a section for optional additional_lesson_instructions, that will be set in inputs by the user.
The prompt must include a format instructions section, saying that because the text is for audio conversion, it should be flowing, there shouldn't be any special formatting, it should be one long flowing paragraph.
The prompt must say to introduce each new(sub)topic, so that the listener can follow along well.
The lesson text should be clear and engaging.
</instructions for step 2>

<intermediary step instructions>
After the text generation, add an intermediary step to remove special characters if any where still present in the generated text. It should remove special character like ##, **, \n and so on.
</intermediary step instructions>

<instructions for step 3>
This audio generation step is optional. It will be set as 'yes' or 'no' in configuration.
Add a step to validate this configuration, it must be either 'yes' or 'no'.
Use the cleaned generated lesson text and the eleven labs tool to convert the file to audio.
Retrieve the name of the original .pptx file, and use this name to rename the audio file.
</instructions for step 3>

<error instructions>
Handle errors gracefully.
Each step should have its own informative error messaging.
</error instructions>

<output instructions>
The output must contain the extracted content, the generated text, the optional audio file, error logs and a status.
</output instructions>
Alternatively, you can build the tool progressively, step-by-step, by first building the content extraction part, then adding the lesson text generation, then the audio generation, and finally adding general improvements.
Below, you can study a step-by-step implemention of the tool.
Part 1 : Extracting the text content from a .pptx file
You can try to build the content extraction feature first using the AI assistance, and then later on add the other features.
To do so, do not select any tool as this feature does not rely on any, and use a good prompt. Because the prompt would be short as it is about just one feature, you can make it very thorough and add details on how to build the tool without risking to overwhelm the LLM. Here is an example prompt to create a tool that extracts the text content from a .pptx file :
<task>
Create a tool that extracts the text content of a .pptx file presentation.
</task>

<input instructions>
The .pptx file will be given as a path in input.
Use string format.
</input instructions>

<configuration instructions>
1 configuration : the path to the Tesseract executable.
Use string.
</configuration instructions>

<instructions>
Extract the text content of the .pptx file slide by side and shape by shape.
Make sure to include text extraction from all possible shapes with text, including from tables and graphs.
Use Tesseract OCR to extract text from picture shapes.
The executable path of Tesseract will be set in configuration.
If no content was obtained for a shape, remove it from the output. Do not show shapes with empty content.
</instructions>

<error instructions>
Handle errors gracefully.
Each step should have its own informative error messaging.
</error instructions>

<output instructions>
The output must contain the extracted content, error logs and a status.
</output instructions>

At the very least, such prompt should create a good code flow for the intended feature, from which you can debug, edit, improve.
Similar prompts were actually used to build the full code above, with step-by-step improvements through prompting and few manual coding.
You should get code that :
- imports libraries and the shinkai tools needed (e.g. Tesseract, ElevenLabs)
- defines the configuration for the Tesseract executable path
- creates the output class for the content, error messages and status
- define 3 functions to extract text from text blocks, tables and charts
- creates a function to extract the content from shapes using the functions defined above, plus use Tesseract OCR for picture shapes
- defines a function to read the presentation from either URL or local file path
- creates a function that applies the content extraction slide by slide and shape by shape
- implement a validation function to stop the tool and log errors if there are issues with the Tesseract OCR implementation
- defines a run function using all the functions defined above.
- includes a step to check if the extracted content is empty or not. It's a useful step because later the tool will use this extracted content to generate a lesson text, and this check will ensure there is a content, and stop the tool and inform the user if there isn't, saving compute and time.
Part 2 : Adding a LLM prompt processor to generate a lesson text
Now you can use the AI-assisted tool builder to add a step that generates the lesson text, using the slides content extracted in the first step.
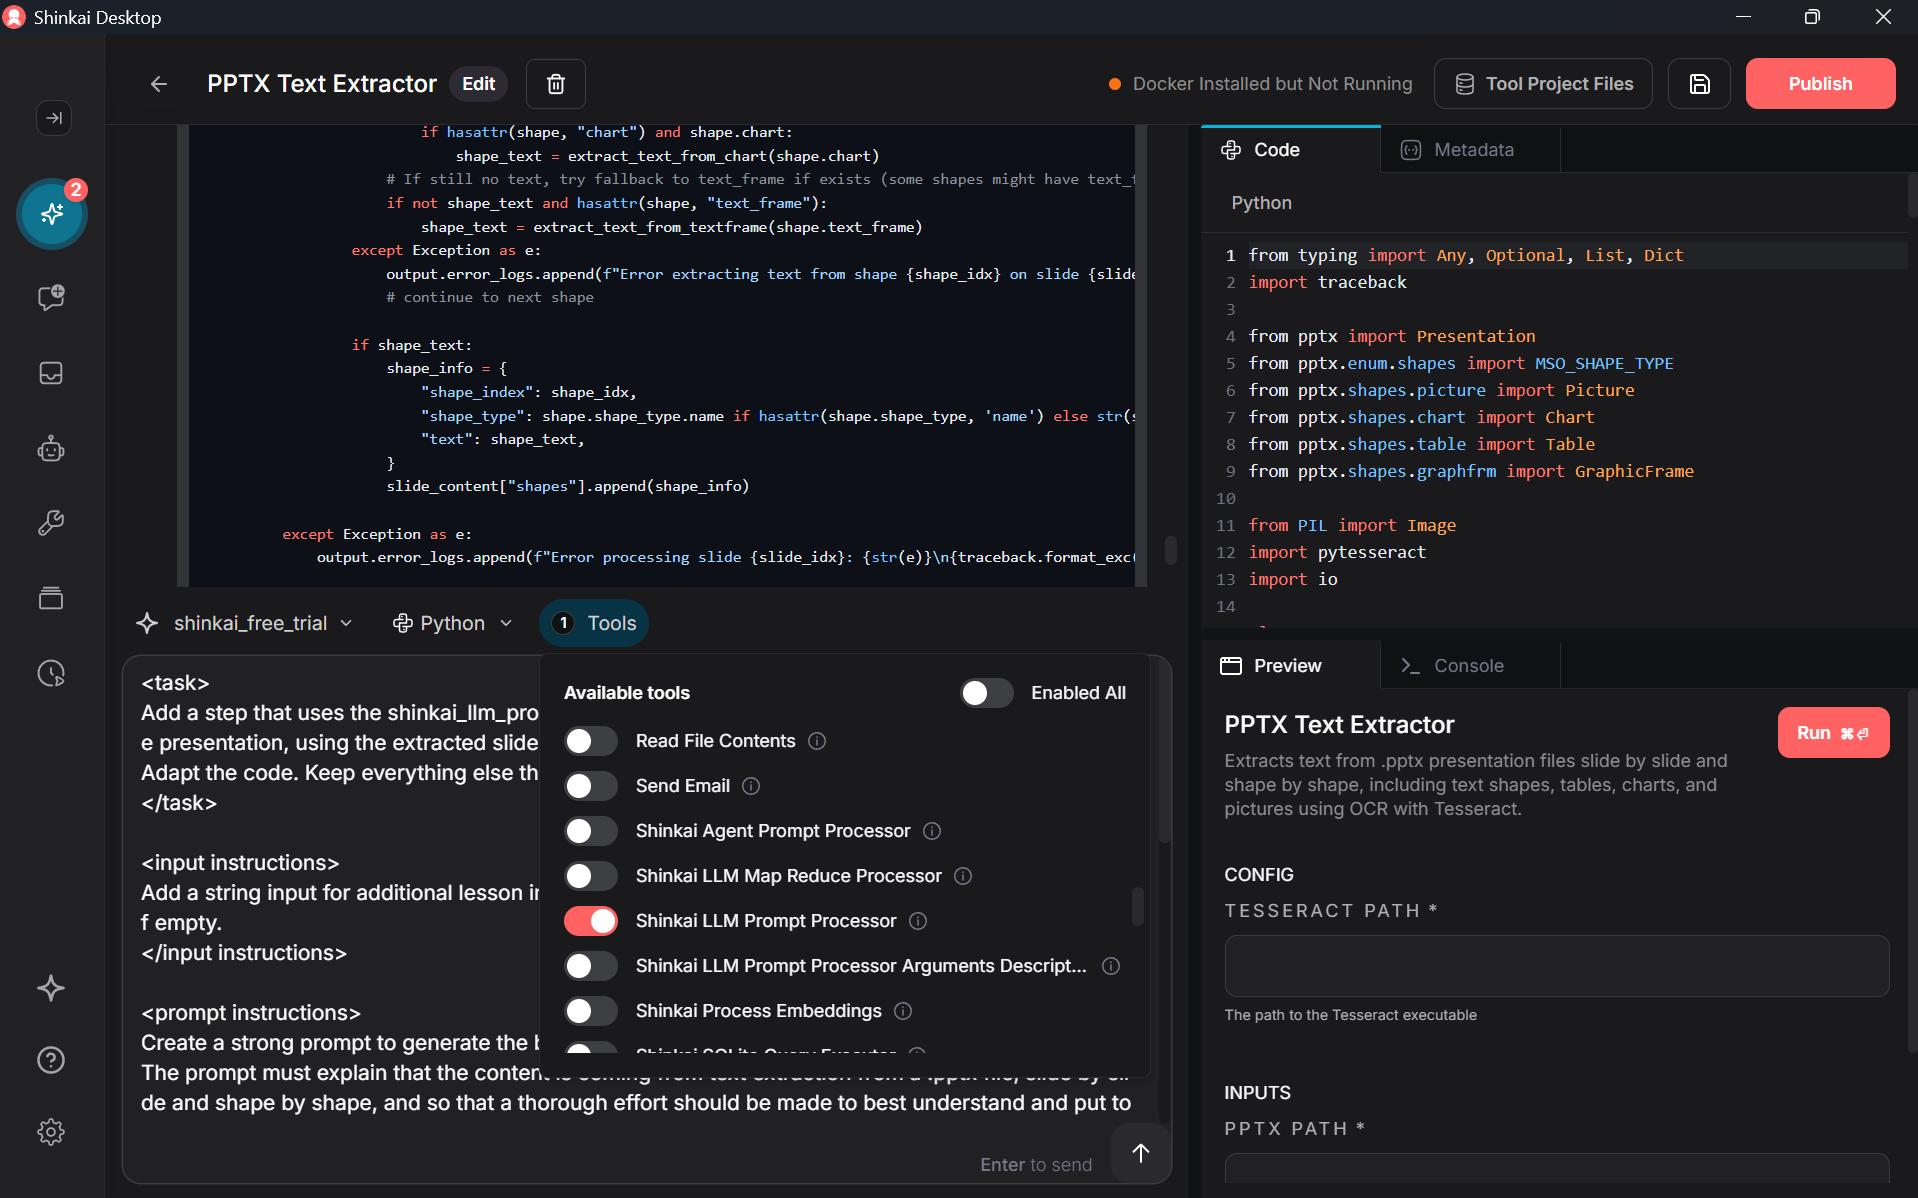
To do so, activate the tool 'shinkai_llm_prompt_processor', and use a prompt similar to this one :
<task>
Add a step that uses the shinkai_llm_prompt_processor tool to generate the text for a lesson about the presentation, using the extracted slides content.
Adapt the code. Keep everything else the same.
</task>

<input instructions>
Add a string input for additional lesson instructions to generate the lesson text. It defaults to 'None' if empty.
</input instructions>

<prompt instructions>
Create a strong prompt to generate the best lesson text from the extracted and format it well.
The prompt must explain that the content is coming from text extraction from a .pptx file, slide by slide and shape by shape, and so that a thorough effort should be made to best understand and put together the content of each slide.
The prompt must include a section for optional additional_lesson_instructions, that will be set in inputs by the user.
The prompt must include a format instructions section, saying that because the text is for audio conversion, it should be flowing, there shouldn't be any special formatting, it should be one long flowing paragraph.
The prompt must say to introduce each new(sub)topic, so that the listener can follow along well.
The lesson text should be clear and engaging.
</prompt instructions>

<additional step instructions>
After the lesson text generation, add a step to remove special characters if any are still present in the generated text. It should remove special character like ##, **, \n and so on.
</additional step instructions>

<error instructions>
Handle errors gracefully.
Each step should have its own informative error messaging.
</error instructions>

<output instructions>
The output must contain the extracted content, the generated text, error logs and a status.
</output instructions>
At the very least, such prompt should add a good code flow for the intended additional feature, from which you can debug, edit, improve.
Similar prompts were actually used to add this next feature, with step-by-step improvements through prompting and few manual coding.
You should get code that :
- adds to the imports the 'shinkai_llm_prompt_processor' tool
- adds an input for additional instructions to generate the lesson text, so that the user can customize it. Set default to 'none'.
- adds an output for the generated lesson
- adds a step to defined a detailed prompt to generate optimal lesson text. Give some context describing the type of content the LLM will use and its specificities. Include formatting instructions. Include the optional additional instructions coming from the user. Organise it well and use tags to make things clear for the LLM.
- calls the LLM prompt processor tool using the prompt defined above.
- cleans the text generated lesson text from special characters, in case the LLM includes some despite our prompt format instructions
- includes the cleaned generated text in the output.
Part 3 : Adding an optional text-to-speech feature to create an audio file of the lesson
Now you can use the AI-assisted tool builder to add a final optional step which generates an audio file of the cleaned lesson text generated by the 2nd feature of the tool.
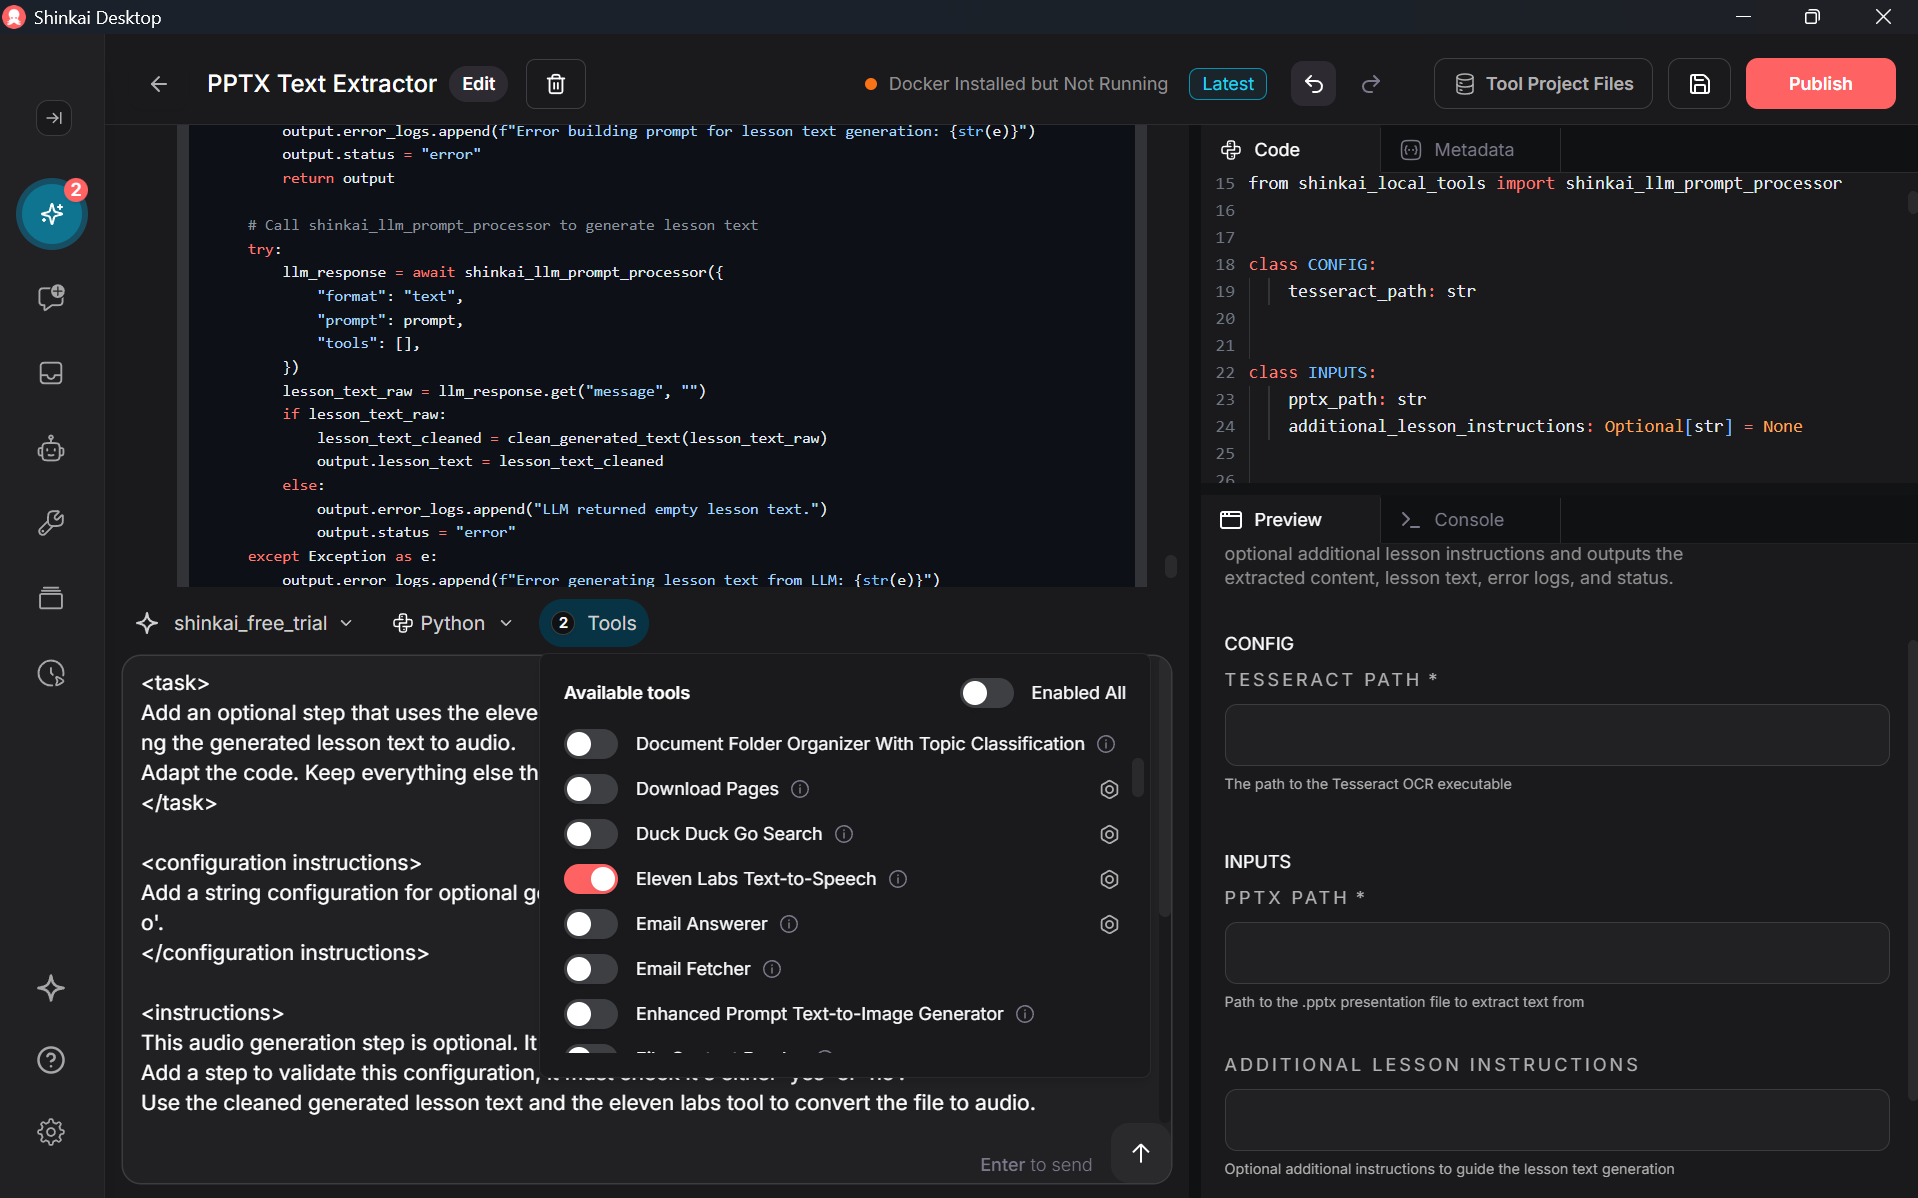
To do so, activate the tool 'eleven_labs_text_to_speech', and use a prompt similar to this one :
<task>
Add an optional step that uses the eleven_labs_text_to_speech tool to create an audio file by converting the generated lesson text to audio.
Adapt the code. Keep everything else the same.
</task>

<configuration instructions>
Add a string configuration for optional generation of the audio, it's either 'yes' or 'no', it defaults to 'no'.
</configuration instructions>

<instructions>
This audio generation step is optional. It will be set as 'yes' or 'no' in configuration.
Add a step to validate this configuration, it must check it's either 'yes' or 'no'.
Use the cleaned generated lesson text and the eleven labs tool to convert the file to audio.
Retrieve the name of the original .pptx file, and use this name to rename the audio file.
</instructions>

<error instructions>
Handle errors gracefully.
Each step should have its own informative error messaging.
</error instructions>

<output instructions>
The output must contain the extracted content, the generated text, the optional audio file, error logs and a status.
</output instructions>
At the very least, such prompt should add a good code flow for the intended last feature, from which you can debug, edit, improve.
Similar prompts were actually used to add this next feature, with step-by-step improvements through prompting and few manual coding.
You should get code that :
- adds the 'eleven_labs_text_to_speech' tool to the import, and also 'shutil' (used for file operations).
- adds to the the config the option to generate the audio
- adds to the output the optional audio file
- defines a function to get the name of the .pptx file. It will be used to save the audio file with the same name.
- adds a step to the validate_config function to also check the configuration of the optional audio generation.
- adds a step to the run functions to call the 'eleven_labs_text_to_speech' tool. This step is optional according to the configuration.
- adds a step to change the name of the audio file generated by the text-to-speech tool : make it more user-friendly by simply using the name of the original .pptx file.
- includes an error message if the audio file generation failed.
Note: You can modify the tool to use another text-to-speech provider, including local options, by adjusting the relevant code.
Part 4 : Troubleshooting
If the tool created or modified by the AI assistance generates errors when you run it, consider these steps:
- Provide Feedback : Copy the error message and the relevant code snippet back into the AI tool builder chat. Explain what input caused the error and ask the AI to fix it.
- Use a More Capable LLM : Some LLMs are better at coding tasks than others. If you're using a less capable model, try switching to one known for stronger coding abilities.
- Refine Your Prompts : Make your instructions even more specific. Break down complex requests into smaller sub-tasks. Clearly define expected inputs, outputs, and error conditions for each part.
- Isolate the Problem : If the multi-step tool fails, try running only the first step (e.g., text extraction) by commenting out later steps or using a simpler version of the tool. Once the first step works, incrementally add back the next steps until you find where the error occurs.
- Examine Intermediate Outputs : Modify the code temporarily to print or output intermediate results (like the raw extracted text before the LLM call, or the LLM output before cleaning/TTS) to see if the data looks as expected at each stage.
- Seek Community Support : For additional help, contact the Shinkai support team or join the Shinkai community on Discord to ask questions and share your problem.
Part 5 : Perfecting your tools combination : useful prompts
For complex tools that chain multiple steps and call other tools, careful design is crucial for usability, reliability, and maintainability. Here are common areas for refinement and example prompts you can use with the AI tool builder to improve your PPTX-to-audio tool :
Changing Configurations to Inputs : Decide carefully what should be a fixed setting (config) versus a per-run choice (input). Things that change often belong in inputs.
- Move Audio Option to Input : Change generate_audio from a CONFIG parameter to an INPUTS parameter. Type: string, valid values: 'yes' or 'no', default: 'no'. Add input validation for these values. Error message if invalid: "Invalid input for generate_audio: Must be 'yes' or 'no'." Keep rest unchanged.
- Make Tesseract Path an Optional Input : Change tesseract_path from a mandatory CONFIG parameter to an optional INPUTS parameter. If not provided by the user, attempt to find Tesseract in the system PATH or use a reasonable default. Add validation to ensure the provided or found path points to a valid, executable file. Error message if invalid: "Invalid Tesseract path: Cannot find or execute the Tesseract binary." Keep rest unchanged.
Renaming Parameters : Ensure variable, function, and output names are explicit and unambiguous. This helps both users understand the tool's parameters and results and the AI interpret the results as well as understand how to apply code modification prompts correctly.
- Rename Output Fields : Rename the output field content_of_the_presentation to extracted_raw_text_content. Rename the output field lesson_about_the_presentation to generated_lesson_text. Update all internal references to these fields accordingly. Keep rest unchanged.
- Rename Instruction Input : Rename the input field additional_lesson_generation_instructions to custom_llm_instructions. Update all internal references, including within the LLM prompt construction. Keep rest unchanged.
Adding Optional Features : Introduce new capabilities or customization options for the user.
- Add Slide Selection Input : Add a new optional INPUTS parameter process_slides. Type: string, default: 'all'. Allow comma-separated slide numbers (e.g., '1,3,5-7'). Modify the text extraction logic to process only the specified slides. Add validation to ensure input is 'all' or valid numbers/ranges. Error message if invalid: "Invalid process_slides value: Must be 'all' or comma-separated slide numbers/ranges (e.g., '1,3,5-7')." Keep rest unchanged.
- Add Voice Selection Input : Add a new optional INPUTS parameter audio_voice_id. Type: string, default: 'default' (or a sensible default voice ID from ElevenLabs). Pass this value to the eleven_labs_text_to_speech tool when called. (Note: Validation might occur within the ElevenLabs tool itself, but you could add a basic check if needed). Keep rest unchanged.
Enhancing Validation and Error Handling : Add checks for inputs and configurations early to fail fast and provide clear error messages. Make error reporting more specific.
- Validate Input File Path : Enhance validation for the file_path input. Check if it ends with '.pptx' (case-insensitive). For local paths, verify the file exists. For URLs, perform a basic check if it looks like a valid HTTP/HTTPS URL (detailed check happens during download). Error message if basic checks fail: "Invalid file_path: Must be a valid local .pptx file path or a valid HTTP/HTTPS URL pointing to a .pptx file." Keep rest unchanged.
- Include Specific LLM Error : Modify the error handling for the shinkai_llm_prompt_processor call. If the call fails or the LLM tool returns an error status, capture the specific error message provided by the LLM tool and include it in the main tool's OUTPUT.message. For example: "LLM processing failed: [Specific error message from LLM tool]". Keep rest unchanged.
- Check Tesseract Path Early : Add validation in validate_config (or validate_inputs if moved) to explicitly check if the tesseract_path (whether from config or input) points to an existing, executable file before attempting any OCR. Error message: "Tesseract path check failed: Path '[path]' is not a valid executable file." Keep rest unchanged.
Enhancing Output Flexibility : Provide more detailed or intermediate outputs for debugging or advanced use cases.
- Output Raw OCR Text Separately : Add a new OUTPUT field extracted_ocr_texts. Type: List[str]. During shape processing, when OCR is performed on an image, store the extracted text in this list in addition to adding it to the main extracted content. Make this output optional using a config. Keep rest unchanged.
- Output LLM Prompt : Add a new OUTPUT field llm_prompt_used. Type: string. Before calling the shinkai_llm_prompt_processor, store the fully constructed prompt string in this output field for debugging purposes. Make this output optional using a config. Keep rest unchanged.
- Output Intermediate Text : Add a new OUTPUT field raw_llm_generated_text. Type: string. Store the text received directly from the LLM before the clean_special_characters step is applied. Make this output optional using a config. Keep rest unchanged.
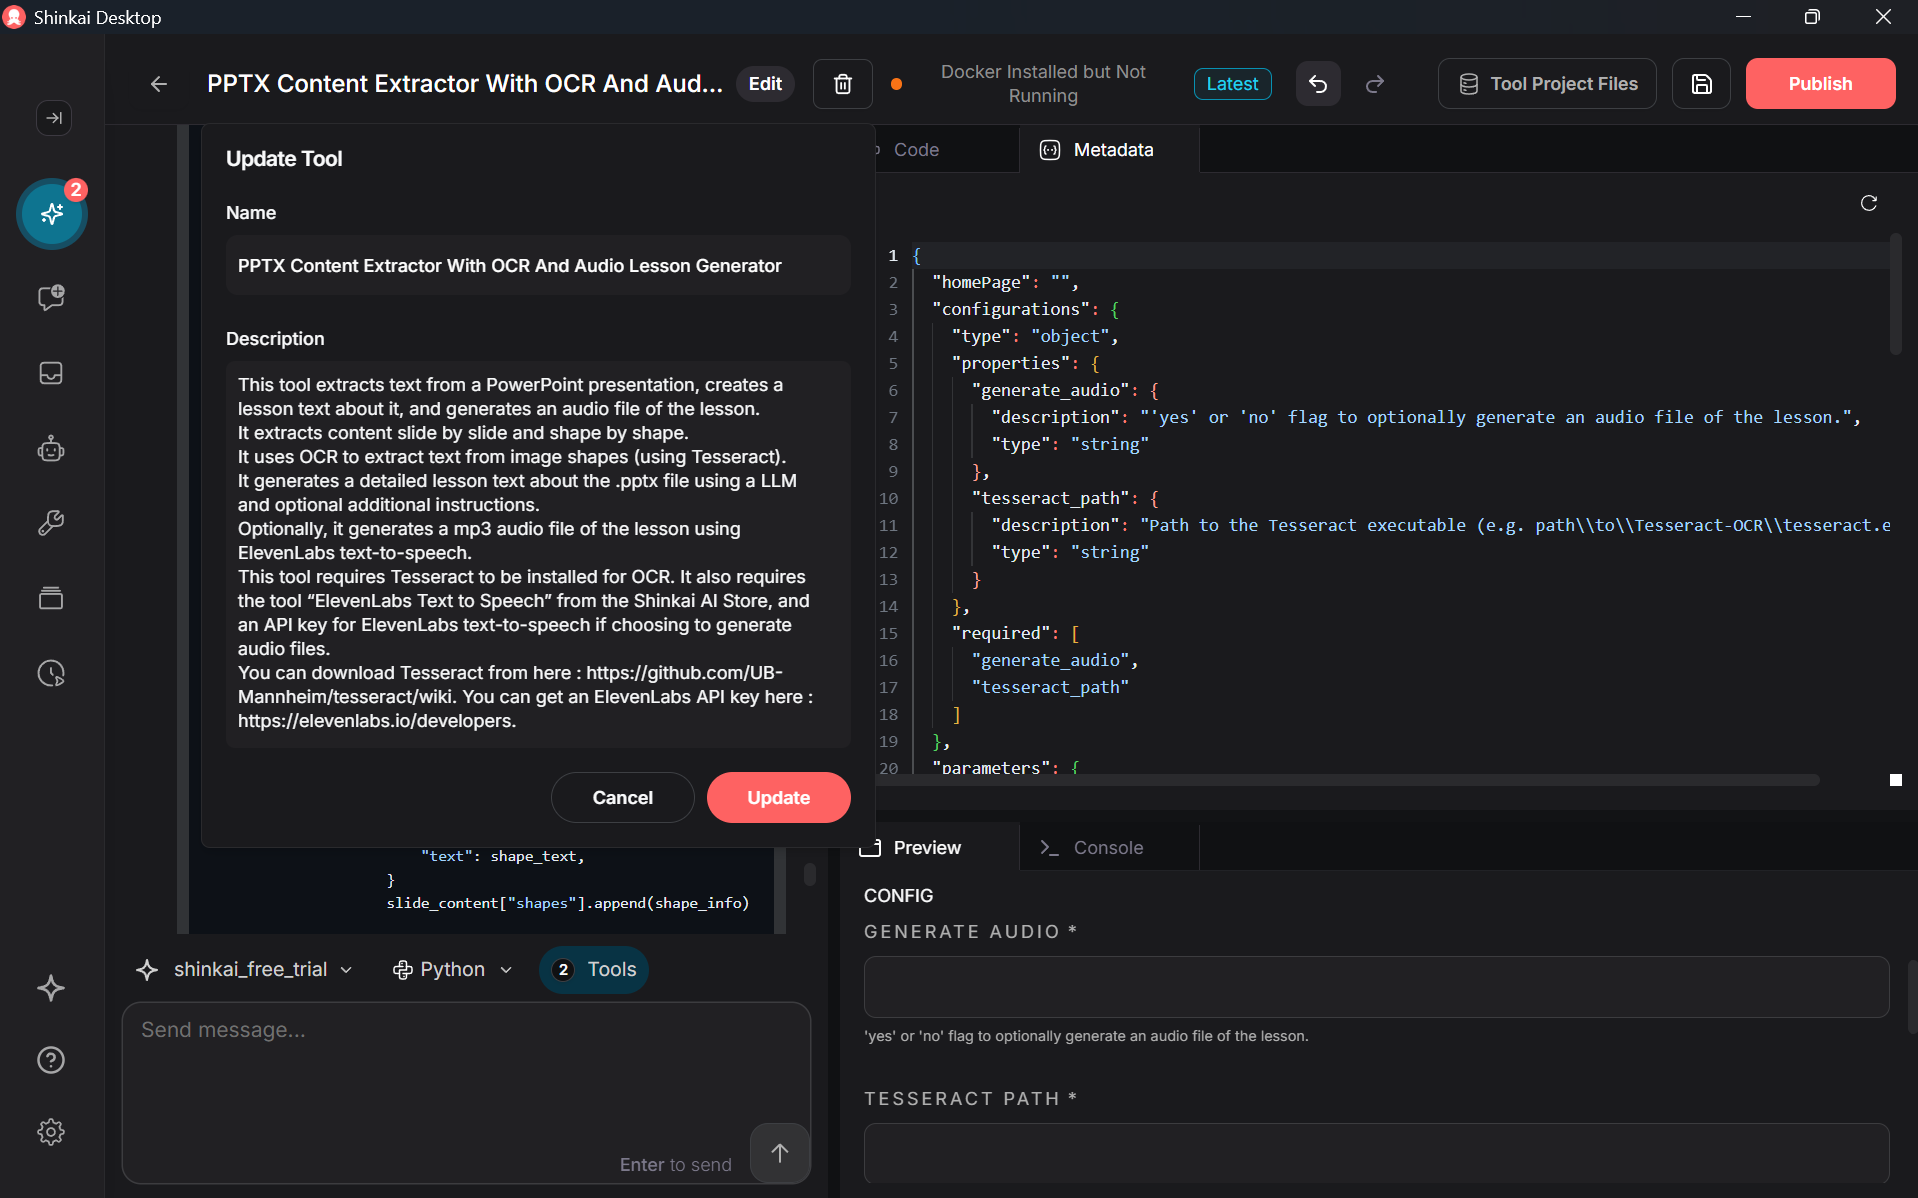
Part 6 : Improving the metadata of the tool
Shinkai automates tool metadata generation, but you can enhance it.
Good tool metadata should include :
- an explicit tool title
- a thorough description (features, options, requirements, extra information)
- explicit descriptions for configurations and inputs
- adequate usable keywords to trigger the tool
Go to the metadata section, and improve the above. Below is a good metadata for the tool.
Title :
PPTX Content Extractor With OCR And Audio Lesson Generator
Description :
This tool extracts text from a PowerPoint presentation, creates a lesson text about it, and generates an audio file of the lesson.
It extracts content slide by slide and shape by shape.
It uses OCR to extract text from image shapes (using Tesseract).
It generates a detailed lesson text about the .pptx file using a LLM and optional additional instructions.
Optionally, it generates a mp3 audio file of the lesson using ElevenLabs text-to-speech.
This tool requires Tesseract to be installed for OCR. It also requires the tool “ElevenLabs Text-to-Speech” from the Shinkai AI Store, and an API key for ElevenLabs text-to-speech if choosing to generate audio files.
You can download Tesseract from here : https://github.com/UB-Mannheim/tesseract/wiki. You can get an ElevenLabs API key here : https://elevenlabs.io/developers.
Metadata JSON :
{
  "homePage": "",
  "configurations": {
    "type": "object",
    "properties": {
      "generate_audio": {
        "description": "'yes' or 'no' flag to optionally generate an audio file of the lesson.",
        "type": "string"
      },
      "tesseract_path": {
        "description": "Path to the Tesseract executable (e.g. path\\to\\Tesseract-OCR\\tesseract.exe).",
        "type": "string"
      }
    },
    "required": [
      "generate_audio",
      "tesseract_path"
    ]
  },
  "parameters": {
    "type": "object",
    "properties": {
      "additional_lesson_generation_instructions": {
        "description": "Optional additional instructions for lesson text generation",
        "type": "string"
      },
      "file_path": {
        "description": "Path or URL of the PowerPoint file (e.g. path\\to\\your_presentation.pptx).",
        "type": "string"
      }
    },
    "required": [
      "file_path"
    ]
  },
  "result": {
    "type": "object",
    "properties": {
      "audio_file": {
        "description": "Path to the generated audio file",
        "nullable": true,
        "type": "string"
      },
      "content_of_the_presentation": {
        "description": "Text content extracted from the presentation",
        "items": {
          "type": "string"
        },
        "type": "array"
      },
      "lesson_about_the_presentation": {
        "description": "Text of the generated lesson",
        "nullable": true,
        "type": "string"
      },
      "message": {
        "description": "Error message or additional info",
        "nullable": true,
        "type": "string"
      },
      "status": {
        "description": "The status of the operation",
        "type": "string"
      }
    },
    "required": [
      "status"
    ]
  },
  "sqlTables": [],
  "sqlQueries": [],
  "oauth": [],
  "runner": "any",
  "operating_system": [
    "linux",
    "macos",
    "windows"
  ],
  "tool_set": "",
  "keywords": [
    "pptx",
    "powerpoint",
    "lesson",
    "presentation",
    "audio"
  ],
  "version": "1.0.0"
}
Now the tool should be complete. Save it.
Below you'll find usage examples.
Part 7 : Using the tool 'PPTX Content Extractor With OCR And Audio Lesson Generator'
7.1 Installing extra components and setting up configurations
Install Tesseract for OCR, and set its executable path in the configuration of the 'PPTX Content Extractor With OCR And Audio Lesson Generator' tool.
Install the 'eleven_labs_text_to_speech' tool from the Shinkai AI Store. Get an ElevenLabs API key with some credits. Go to the configuration tab of this ElevenLabs Shinkai tool and set your API key and pick a voice.
Set audio generation to 'yes' or 'no' in the configuration of the 'PPTX Content Extractor With OCR And Audio Lesson Generator'.
7.2 Usage examples
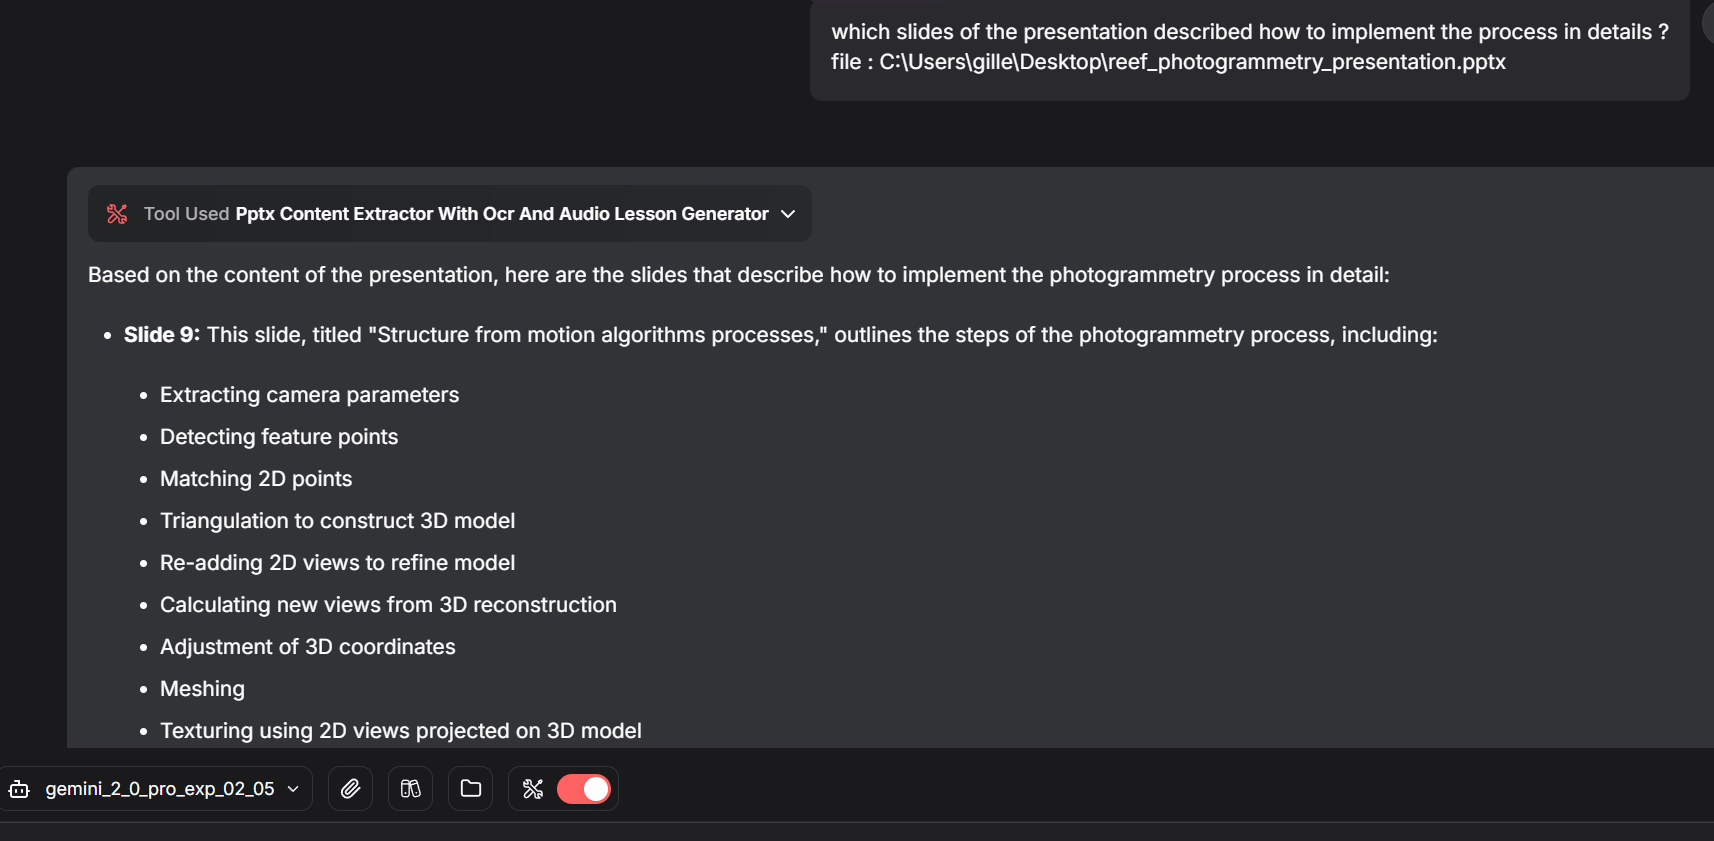
To generate an audio lesson from a .pptx file, set audio generation to 'yes' in the configuration and include the filename in your prompt.
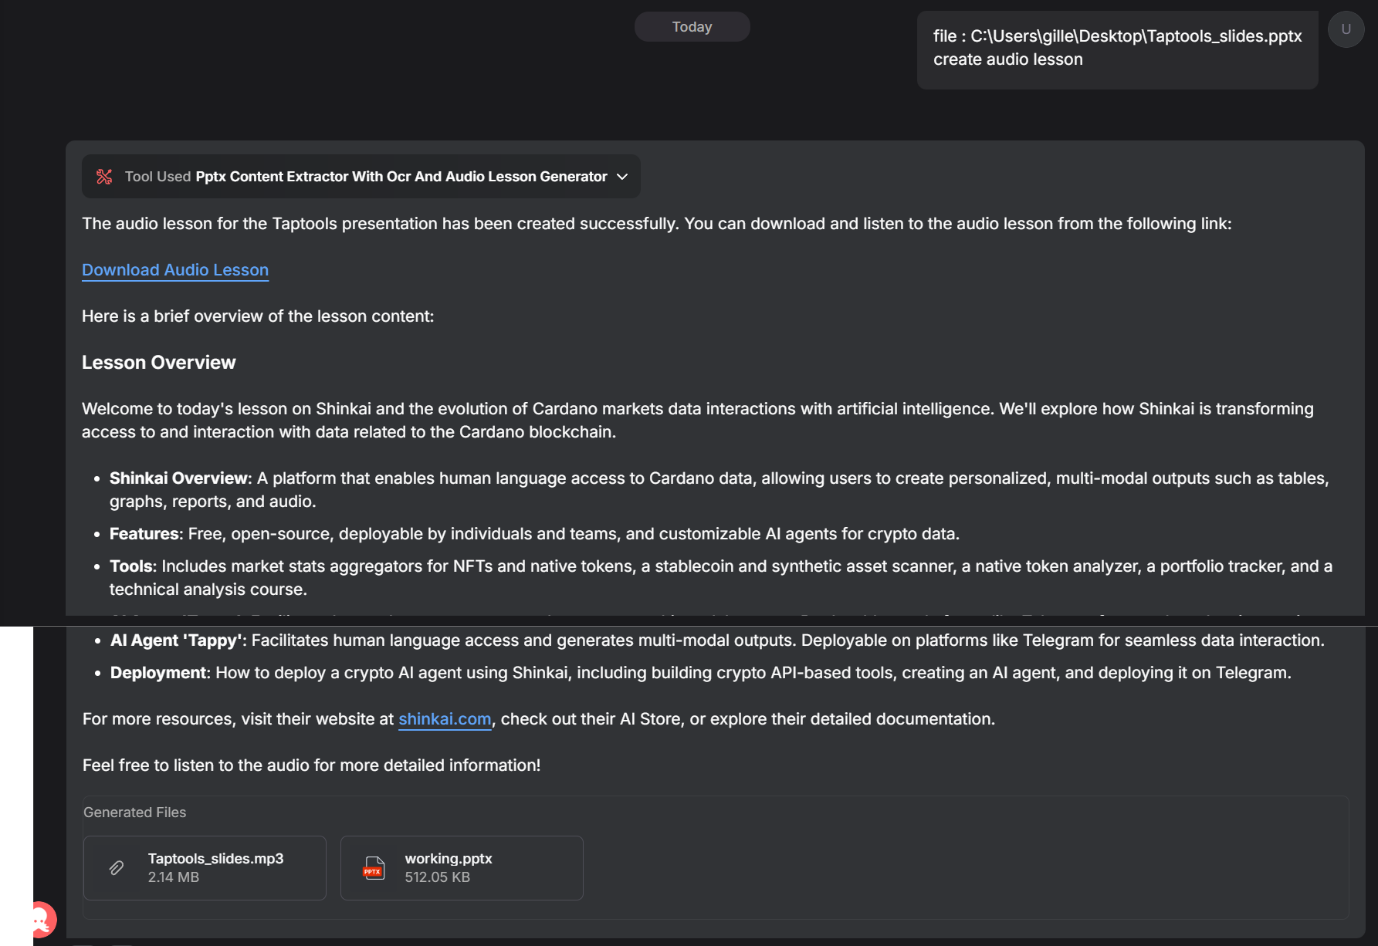
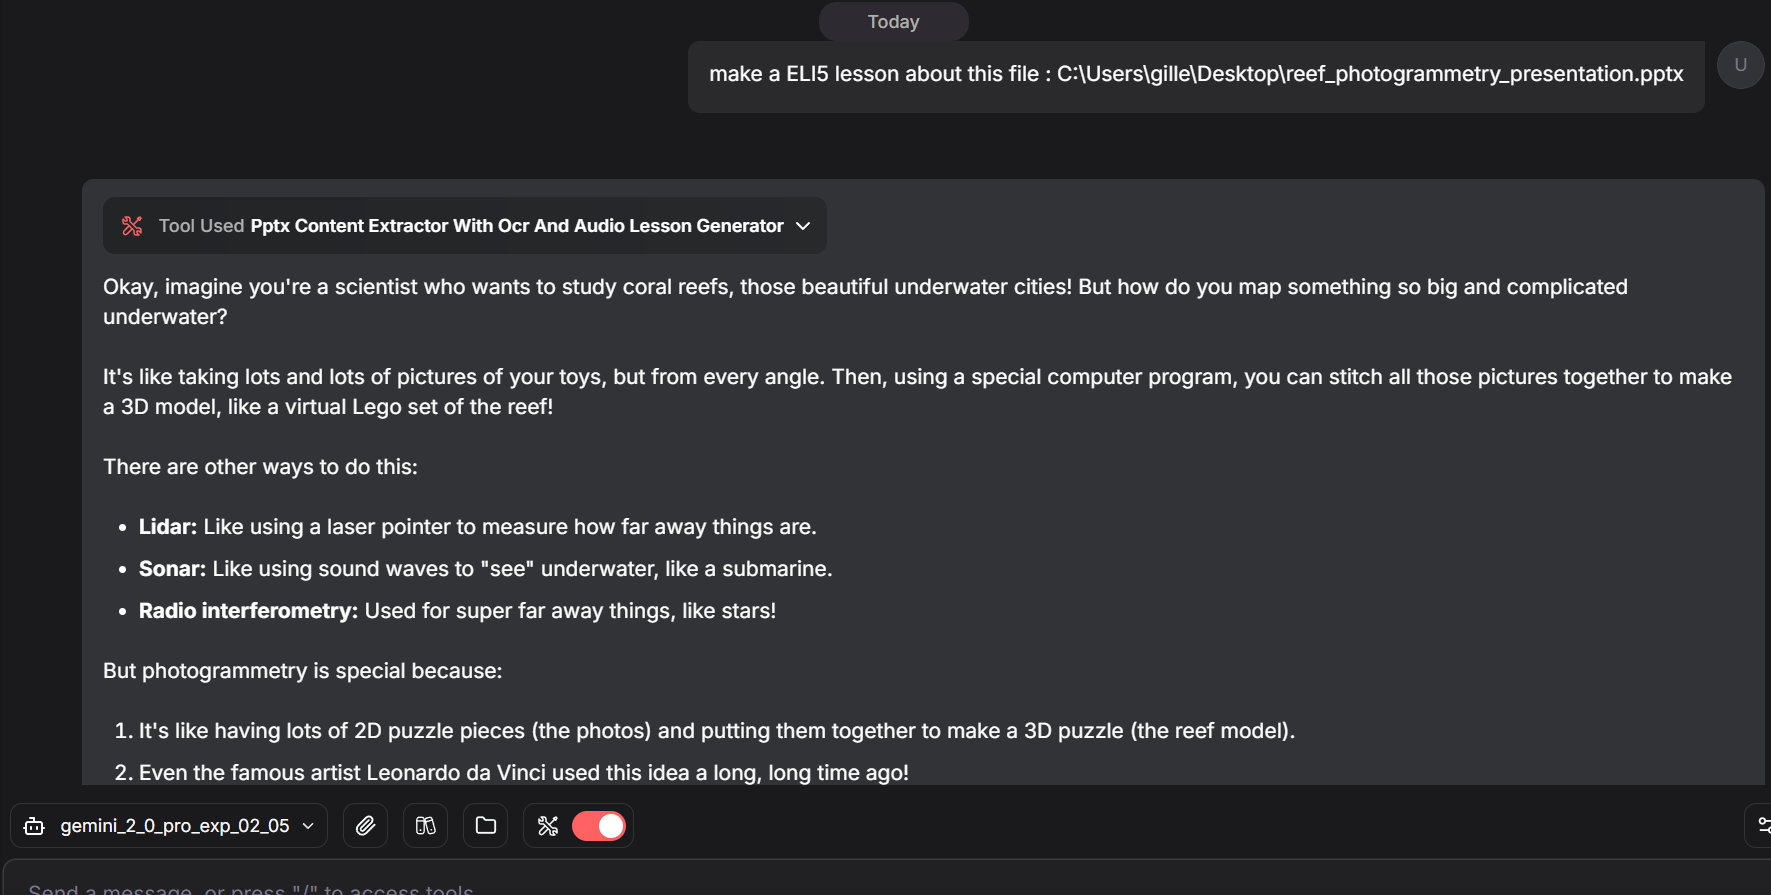
To interact with the .pptx file content through prompts, have the audio generation set on 'no', include the file path in your prompt, and add instructions.
Because the content is extracted slide by slide, you can also ask about specific slides.